![(please configure the [header_logo] section in trac.ini)](/repos/chrome/site/pj.jpg)
| Version 8 (modified by bennylp, 16 years ago) (diff) |
|---|
Media Concepts
TracNav
Media Objects
Media objects are objects that are capable to either produce media or takes media, with media in this case is audio. In PJMEDIA terms, these objects are implemented as media ports (pjmedia_port).
There are several type of media objects supported in pjsua:
- call, obviously, to transmit and receive media to/from remote person.
- WAV file player to play WAV file
- WAV file recorder to record audio to a WAV file
- WAV playlist, to playback multiple WAV files sequentially.
More media objects may be added in the future.
We will only discuss the basic concept about media in this chapter. Detailed operations on these media objects will be explained on the next chapter.
The Conference Bridge
In pjsua Python module and in PJSUA API in general, all media objects are terminated in the central conference bridge so that they are easier to manipulate. When objects are plugged-in to the conference bridge, they will be given a slot number that identifies the objects in the bridge.
Each object provides different API to fetch the slot number associated with it:
- for Call object, the slot number is in conf_slot of the CallInfo structure, so it can be fetch with call.info().conf_slot (once the media is active of course).
- for WAV file player, use lib.player_get_slot()
- for WAV playlist, use lib.playlist_get_slot()
- for WAV file recorder, use lib.recorder_get_slot()
The conference bridge provides a simple but yet powerful API to manage audio routing between the audio objects. The principle is very simple, that is you connect audio source to audio destination, and the bridge will make the audio flows from the source to destination, and that's it. If more than one sources are transmitting to the same destination, then the audio from the sources will be mixed. If one source is transmitting to more than one destinations, the bridge will take care of duplicating the audio from the source to the multiple destinations.
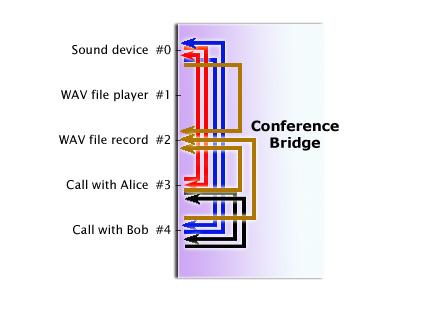
Lets see a diagram of a conference bridge with several media objects.

The diagram above shows the conference bridge with the following objects:
- sound device, which by convention is always attached at slot number 0
- a WAV file to be played back at slot 1
- a WAV file for recording at slot 2
- an active call to Alice at slot 3
- an active call to Bob at slot 4
When a media object is plugged-in to the bridge, it will not be connected to anything, so media will not flow from/to any objects.
WAV File Playback
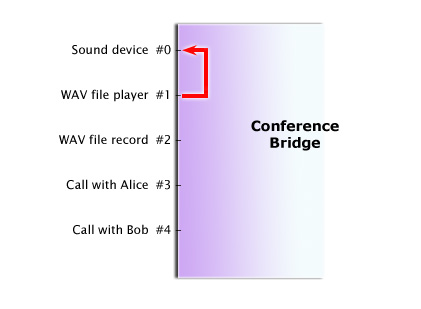
To playback the WAV file to the speaker, just connect the WAV playback object to the sound device, to make a connection like this:

The red line in the diagram above shows the media flow from the WAV playback object to the sound device.
Here's the code to connect the WAV playback object to the speaker:
lib.conf_connect(1, 0)
The conf_connect() method takes two arguments:
- the first argument is the slot number of the source media object, in this case one (1) for the WAV file playback, and
- the second argument is the slot number of the destination media object, in this case zero for the sound device
Once you're done with the playback, just disconnect the connection to stop the playback:
lib.conf_disconnect(1, 0)
Recording to WAV File
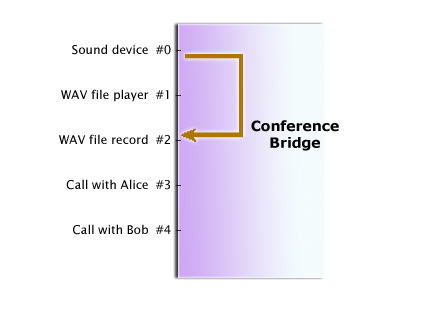
Or if you want to record the microphone to the WAV file, simply do this:
lib.conf_connect(0, 2)
And the media will flow from the sound device to the WAV record file, as shown as brown line in the diagram below:

As usual, to stop or pause recording, just disconnect the connection:
lib.conf_disconnect(0, 2)
(Note that disconnecting the WAV recorder as above does not close the WAV file, and you can resume recording by connecting a source to the WAV recorder again. You cannot playback the recorded WAV file before you close it.)
Looping Audio
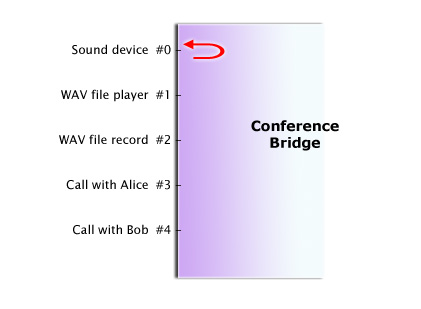
If you want, you can loop the audio of a media object to itself (i.e. the audio received from the object will be transmitted to itself). For example, you can loop the audio of the sound device with:
lib.conf_connect(0, 0)
That will make the following connection:

With the above connection, audio received from the microphone will be played back to the speaker. This is useful to test whether the microphone and speaker are working properly.
You can loop-back audio from any objects, as long as the object has bidirectional media. That means you can loop the call's audio, so that audio received from the remote person will be transmitted back to her/him. But you can't loop the WAV player or recorder since these objects can only play or record and not both.
Normal Call
For a normal call, we would want to establish bidirectional audio with the remote person (with Alice, in this case), which can be done easily by connecting the sound device and the call and vice versa:
 # This will connect the sound device/mic to the call
 lib.conf_connect(0, 3)

 # And this will connect the call to the sound device/speaker
 lib.conf_connect(3, 0)
Of course on a real application, we will replace the number "3" above with the slot number of the call, which we can get with call.info().conf_slot.
The diagram below shows the interconnection in the bridge now:

You can see in the diagram above the bidirectional audio between sound device and the call as shown in red lines.
Second Call
Suppose we want to talk with Alice and Bob at the same time. Since we already have bidirectional media connection with Alice, we just need to add bidirectional connection with Bob using the code below.
  lib.conf_connect(0, 4)
  lib.conf_connect(4, 0
The interconnection diagram in the bridge will be like this, with the code above adds the blue lines below:

Now we can talk to Alice and Bob at the same time, and we will hear audio from either party. But at this stage, Alice and Bob can't talk or hear each other (i.e. we're not in full conference mode yet).
Conference Call
To make Alice and Bob talk to each other, just establish bidirectional media between them:
 lib.conf_connect(3, 4)
 lib.conf_connect(4, 3)
The snippet above will add the new connections as shown as black lines below:

Now the three parties (us, Alice, and Bob) will be able to talk to each other.
Recording the Conference
While doing the conference, it perfectly makes sense to want to record the conference to a WAV file, and all we need to do is to connect the microphone and both calls to the WAV recorder:
 lib.conf_connect(0, 2)
 lib.conf_connect(3, 2)
 lib.conf_connect(4, 2)
The connections in the conference bridge now will look like the diagram below, with the snippet above adds the brown lines in the diagram:

That looks like a pretty intricate connections indeed, but the good thing is we don't need to worry about it as all will be taken care of by the bridge. We only need to care about what the audio routings that we want to achieve.
Attachments (8)
- conference-bridge.jpg (57.6 KB) - added by bennylp 16 years ago.
- conference-bridge-call.jpg (45.7 KB) - added by bennylp 16 years ago.
- conference-bridge-2-calls.jpg (50.7 KB) - added by bennylp 16 years ago.
- conference-bridge-conf-call.jpg (52.3 KB) - added by bennylp 16 years ago.
- conference-bridge-conf-call-record.jpg (56.8 KB) - added by bennylp 16 years ago.
- conference-bridge-wav-playback.jpg (44.3 KB) - added by bennylp 16 years ago.
- conference-bridge-snd-rec.jpg (45.4 KB) - added by bennylp 16 years ago.
- conference-bridge-loop.jpg (44.4 KB) - added by bennylp 16 years ago.
Download all attachments as: .zip